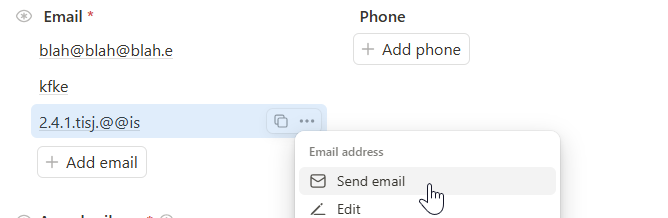
Use the email field to store email addresses in Tape.
Add it to any record to save one or more addresses, label each one by type, and send an email with a tap when you need to reach someone.
We’re happy to release the new email field today across the new record experience, Tape forms, and the mobile app when you create and edit records.
How to get started
1.) Switch to the new record experience in one of your database apps.
· Click the ••• button in the top right
· Select New Record Beta
· Click Set as default for you (all details ➔)
2.) Open any record in a database app
3.) Unlock the record via the ••• menu in the top right
4.) Click the + icon in the left margin whenever you hover over a new line
5.) Select Email from the field type list (Help Center ➔)
To configure an email field:
Open the ⋮⋮ menu in the left margin when you hover over an email field
 What stays familiar
- Enter an email address
Type an address and it is stored on the record. - One or more addresses
SetLimittoNo limitto store several addresses on one record, or1 Emailto keep it to a single entry. - Pick a label
Choose a label for each address from a predefined list:Work,Home, orOther. - Reorder the addresses
An email field holds a list of addresses. Drag and drop to change their order. - Tap to email
Click an address to open your mail client with it ready. - Display options
Choose how the field is shown in a record.RequiredAlways showHide when emptyAlways hide
 What’s new
- Show email labels
Turn the label next to each address on or off. - Show email icon
Turn the email icon on or off. - Custom labels
Beyond the predefined list, add your own labels to fit how you organize addresses, likeBillingorSupport. - Display options
Two new options for how the field is shown:Show after creationshows the field after the record is created.View onlykeeps the field visible but not editable.
- Style settings
Adjust the label display and size, placeholder, tooltip, field icon, and more. The full style system is available for the email field. - Default value
Pre-fill new records with aLabelandEmail address. - Top and bottom description
Add helper text above or below the field, such as instructions, context, or hints for people filling out a form. - Field access (Premium plan feature)
Restrict who can view or edit the email field. - Rules (Premium plan feature)
Show or hide email fields based on other field values. - Rearranging email fields
Use the ⋮⋮ handle next to the field label to drag and drop email fields. Reorder them, move them around the record, or place them into different columns. - Select multiple addresses
Select several with your mouse, then delete or duplicate them with keyboard shortcuts, or drag to rearrange. - Adaptive style settings
The style settings adjust based on whether the field is set to1 EmailorNo limit, so the fields can be styled in the way that fits your setup.
 Start with a template
See a few ready-made examples of how email fields can be used, then adjust them to your own workflow.
Duplicate the  template workspace.
Happy building.