![]() Introducing Supercharged Workflow Automations’ new action,
Introducing Supercharged Workflow Automations’ new action, ![]() Create web link
Create web link ![]()
Tape is built to grow with your business. Building first automation is super simple with Tape. Advanced actions like “Create web link” help you manage even complex business processes and are designed for Tape experts. Want to get more out of Tape? Tape partners are certified consultants and are ready to help. Whether you’d like help deciding what to automate or need a hand building, you’ll find the right fit. Just get in touch with us and we connect you with one of our partners.
If you are a developer check out these resources →
Overview
The action “Create web link” allows you to start running another automation with the trigger “Web link clicked” when a web link has been clicked. For better handling, you can create in-place the related automation with the trigger “Web link clicked”. Set up additionally whether the link should expire and at what time [UPDATE ![]() ] and on click.
] and on click.
Check out the benefits by using the trigger “Create web link”→
Create automation using the action “Create web link”
-
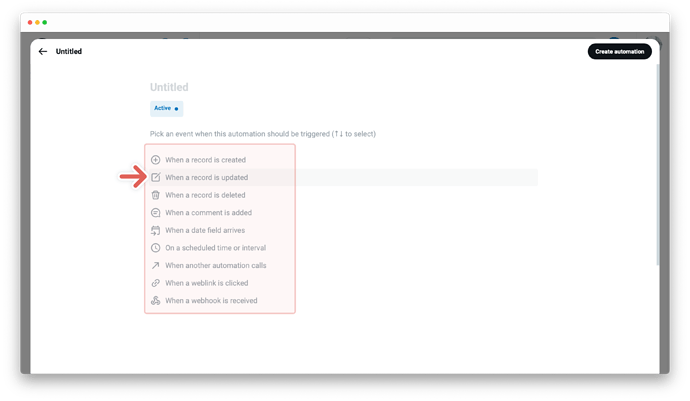
First automation block - Trigger - the “When this happens” automation statement
- Choose a trigger, for example
When a record is updated - Set the trigger by selecting the app where the automation should be triggered
- Choose a trigger, for example
-
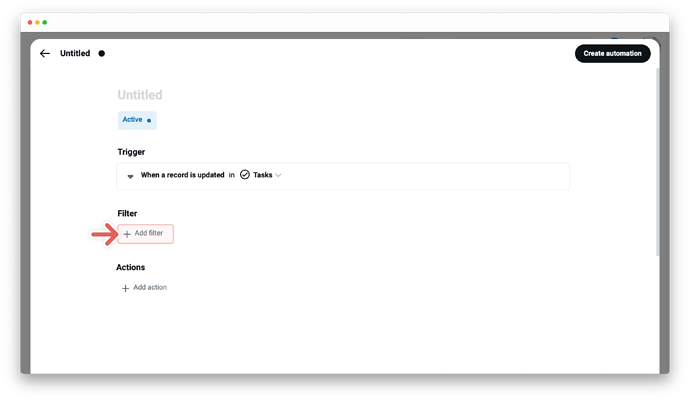
Second automation block - Filter - the “And if conditions are met” automation statement
- Set your filter to start actions only if certain conditions are met:
- A field to be evaluated, at the first dropdown menu
- An operator at the second dropdown menu, i.e., Contains, Does not contain, Is not, etc.
- A field value - enter the field value for the selected field from the first dropdown. Note that the operators e.g. “is empty” and “is not empty” do not require you to input a field value
- Set your filter to start actions only if certain conditions are met:
-
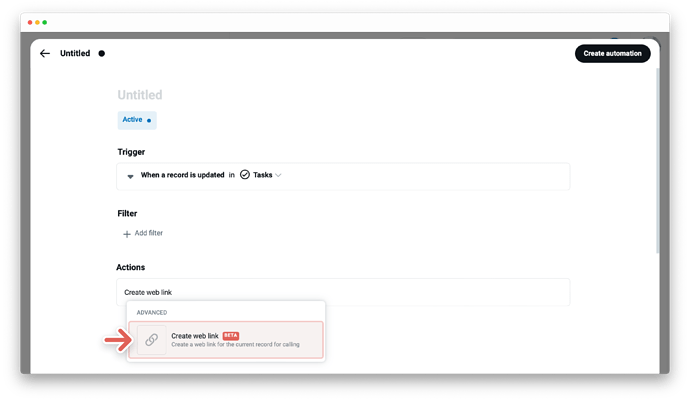
Third automation block - Action - the “Then do that” automation statement
- First, click on
+ Add actionand choose between various actions e.g.Create web link - Choose and setup an additional action
- Click on
+ Add actionand choose between various actions, for example,Send an email- Type the text you want to use for the link
- Highlight the text
- Click the link icon
- Type “@” for variables and select the link
- First, click on
-
Click on
Create automationat the top right
Edit and manage actions
The automation editor allows you to edit or manage actions and holds all the important details about your specific automation. To open the editor - click the card with the title of your automation at the gallery of the automation center. From this point, you can choose between various options. Learn more about →
New to workflow automation by Tape? Here’s a summary of what you need to know about automation.
To enable any type of automation, you’ll need to set up a trigger and one or more actions. Some automations also use filters.
- A trigger is an event that starts an automation. The “When this happens” statement. For example, “When a status changes” Learn more about → 1
- Filters are optional and start actions only if certain conditions are met. The “And if conditions are met” statement. For example, "only if the status changes to done" Learn more about →
-
An action is an event the automation performs automatically after it is triggered. The “Then do that” statement. For example, “then send an email to a customer” Learn more about →


